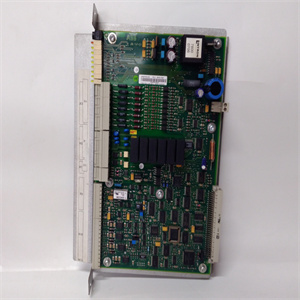
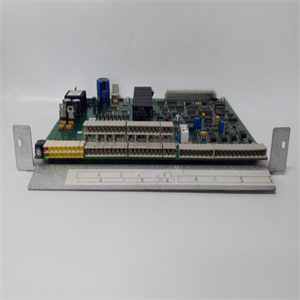
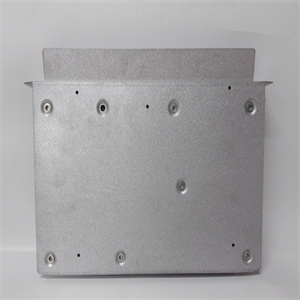
产品展示
联系我们
联系人:麦女士
手机:+86 15270269218
电话:
Q Q:3136378118
邮箱:stodcdcs@gmail.com
地址:江西省九江市瑞昌市东益路23号赛湖农商城401号


单击添加新程序按钮,然后按照屏幕上显示的说明操作(从CD-ROM中选择file Setup.exe)。使用Windows 7和Windows Vista,右键单击安装程序。exe并选择“以管理员身份运行”。如果您的电脑中有DriveWindow软件,并且希望与DriveAP同时使用,则必须遵循《DriveWindow用户手册》中的说明(请参阅10章–信息,2.2节“多个客户端”)。现在,您可以在DriveAP运行时以图形方式监控驱动器参数的实际值。注意:当DriveAP处于联机模式时,请勿使用DriveWindow(或panel)修改参数值。注意:如果仅使用DriveAP的独立模式,则不需要DriveAP硬件。使用DriveWindow和DriveAP安装DriveAP硬件安装DriveAP 2-2 DriveAP用户手册DriveAP可以与DDCS RUSB-02适配器(USB-DDCS)或DDCS PCMCIA(NDPA-02)卡一起使用。《DriveWindow用户手册》中记录了DDCS PCMCIA卡的安装。在PC和RUSB-02适配器之间插入USB 2.0电缆A-B。您应该看到RUSB-02适配器上的有源绿色led。在DDCS板和驱动器之间连接光缆。安装DDCS RUSB-02适配器DriveAP用户手册3-13章-DriveAP的使用您可以使用任务栏中的开始按钮启动DriveAP程序(开始->程序->DriveWare->DriveAP,如果您在软件安装中使用了默认设置)。将显示一个空屏幕。现在,您有两种继续的可能性:•如果要制作新程序,请打开模板文件(例如,对于新的多块程序,请打开MbpaTemplate.ap;对于新的自适应程序,请打开StdTemplate.ap)。注意:以后保存新程序时,不要使用模板文件的名称!•如果要使用现有程序,请打开程序文件(*.ap)或连接到驱动器,然后从连接的驱动器上载程序。DriveAP的用户界面包含两部分:•菜单命令•屏幕上的程序页(如果有),通过菜单命令,您可以例如:•打开和保存程序文件•打印程序页•连接到驱动器•上传和下载程序•启动联机模式•通过屏幕上的程序页启动或停止驱动器中的时间级别,使用鼠标左键和三个键(Ctrl、Alt和Shift),您可以例如:•添加、移动、删除和更改功能块•在块引脚之间建立连接•在实时用户界面中监视引脚值使用DriveAP 3-2 DriveAP用户手册通过鼠标右键显示上下文相关的快速帮助。这说明光标下的项目(如果有)可能执行的操作。例如,当您按下鼠标右键时,如果光标位于块的图钉上,快速帮助将列出可用的图钉操作。按F3键可以打开信息窗口(即使信息窗口已可见,也可以按F3键以更改其内容,请参见下文)。此窗口包含所有可用信息项的列表(例如,所有块的描述),您可以通过单击项目列表中的信息项来选择要查看的信息项。无需关闭此信息窗口,因为它在程序页面上“浮动”。如果按F3键时光标位于程序页面中的某个块上,则该块的描述将显示在信息窗口中。DriveAP包括两种不同的用户界面类型:•标准•这两种界面之间的主要区别是程序页面的数量和布局。当驱动器中的程序已上载(或程序文件已打开)时,DriveAP会自动为该程序选择适当的用户界面。标准用户界面用于自适应编程程序(有关自适应编程方法的更多信息,请参阅AdaptiveProgrammingGuide.pdf手册)。一个程序包含一个时间级别和一个页面,包含三个部分:•用户常数位于左侧•功能块位于在中间。没有块(如果有)显示为空矩形连接和指针参数位于右侧用户界面用于多块编程应用程序。注意:只有DriveAP 2包含此接口。一个程序可以包含多个时间级别,每个时间级别有五个页面(即总页数=5*时间级别数)。所有页面都可以包含以下块:•输入IO块(如果有)位于左侧
Click the Add New Programs button and follow the instructions that appear on the screen (select file Setup.exe from the CD-ROM). With Windows 7 and Windows Vista right click on setup.exe and select run as administrator. If you have the DriveWindow software in your PC and you want to use it at the same time with DriveAP, you must follow the instructions given in the DriveWindow User Manual (see its Chapter 10 – Advanced Information, Section 2.2 Several Clients). Now you can e.g. monitor graphically actual values of drive parameters while DriveAP is running. Note: Do not modify parameter values with DriveWindow (or panel) when DriveAP is in the On-Line Mode. Note: No DriveAP hardware is needed if you use only the StandAlone Mode of DriveAP. Installing DriveAP Software Using DriveWindow with DriveAP Installing DriveAP Hardware Installation of DriveAP 2-2 DriveAP User’s Manual DriveAP can be used with DDCS RUSB-02 adapters (USB-DDCS) or DDCS PCMCIA (NDPA-02) cards . Installation of DDCS PCMCIA card is documented in DriveWindow User’s manual. Plug USB 2.0 Cable A-B between PC and RUSB-02 adapter. You should see Active green led on the RUSB-02 adapter. Connect optical cables between the DDCS board and the drive(s). Installing the DDCS RUSB-02 adapter DriveAP User’s Manual 3 - 1 Chapter 3 - Use of DriveAP You start the DriveAP program by using the Start button in the Taskbar (Start -> Programs -> DriveWare -> DriveAP if you have used the default settings in the software installation). An empty screen is displayed. Now you have two possibilities to continue: • If you want to make a new program, open a template file (e.g. MbpaTemplate.ap for a new MultiBlock program or StdTemplate.ap for a new Adaptive program) Note: Do not use the name of the template file when you later save your new program! • If you want to work with an existing program, open a program file (*.ap) or connect to a drive and upload program from the connected drive. The user interface of DriveAP contains two parts: • Menu commands • The program page on the screen (if any) By menu commands you can e.g.: • Open and save program files • Print program pages • Connect to a drive • Upload and download programs • Start the On-Line Mode • Start or stop the time level in the drive By the program page on the screen, the left button of the mouse and three keys (Ctrl, Alt and Shift) you can e.g.: • Add, move, remove and change function blocks • Make connections between block pins • Monitor pin values in real time User Interface Use of DriveAP 3-2 DriveAP User’s Manual By the right button of the mouse you display context-sensitive Quick Help. This tells the actions that are possible with the item under the cursor (if any). If the cursor is e.g. on a pin of a block when you press mouse’s right button, Quick Help lists the available pin actions. By the F3 key you open the Info window (you can press the F3 key even if the Info window is already visible in order to change its content, see below). This window contains a list of all available info items (e.g. the descriptions of all blocks) and you select the info item you want to see by clicking on it in the item list. It is not necessary to close this Info window because it “floats” on the program page. If the cursor is on a block in the program page when you press the F3 key, the description of this block is displayed in the Info window. DriveAP includes two different user interface types: • Standard • Advanced The main difference between these two interfaces is the number and layout of program pages. When a program from a drive has been uploaded (or a program file has been opened), DriveAP automatically selects the appropriate user interface for the program. Standard User Interface is used with Adaptive Programming programs (see the AdaptiveProgrammingGuide.pdf manual for more information about the Adaptive Programming method). A program contains one time level and one page with three parts: • User constants are at the left side • Function blocks are in the middle. NO blocks (if any) are displayed as empty rectangles. • Connection and Pointer parameters are at the right side Advanced User Interface is used with Multi Block Programming Application programs. Note: Only DriveAP 2 includes this interface. A program can contain several time levels and there are five pages for every time level (i.e. the total number of pages = 5 * number of time levels). All pages can contain blocks as follows: • Input IO blocks (if any) are at the left side
相关产品


